Koji and Koji Starter Recipe
Dec 16th 2024
This page covers my recipe for making white koji. Koji is cooked rice that has been innoculated with a strain of mold from the Aspergillus genus. There's multiple species of Aspergillus used to make koji, but the most common one is Aspergillus Oryzae, which makes white koji.
Koji can be used to make sake, soy sauce, miso, mirin, and other Japanese foods. I have used this koji recipe for making sake.
This page also covers how to make this koji spore and how to collect these spores, so you can propogate your koji starter. The starter that is made from this recipe is not perfect, as it's impure and contains wild yeasts as well, but it's good enough to make several more batches of koji.
Ingredients
- 0.1-1g Koji Starter (usually a mix of some type of flour and Aspergillus Oryzae spores)
- 1kg of white rice
- Large bowl
- Water
This might be a sin, but I like to use Jasmine rice for my koji's and Sake. There's a bit of a "funk" that is added to the flavor for sure, but it's a welcome one.
Tools
- A rice steamer
- Cotton bag with wide mesh or cheesecloth
- Thermometer
- 5gal bucket
- Computer fan (optional)
- A heatpad with thermostat (optional)
- A controllable humidifier (optional)
Recipe
| Step | Notes |
|---|---|
| Weigh out 1kg of rice and add it to a large bowl | |
| Wash the rice with cold water until the water runs clear | For me, this takes about 12-15 "washes" until the water runs clear. The gentler you are in later washes, the clearer the water will run. |
| Cover the rice with water, and leave to soak for about 3hrs for koji, or 12hr for koji starter | For my specific rice, 2 hours of soaking, followed by steaming results in rice that is 132% heaver than before soaking. This is a little bit on the dryer side; you want to be about 135% to 140% heaver. I think 3hr would work perfect. I've also tried to run experiments where I vary the soak time on small rice samples, and weigh the samples before and after to find the effect of soaking. Unfortunately, the samples I used (30g) were too small to show the relationship well. |
| Place the rice in cheesecloth, and leave to dry for 1hr | You want there to be minimal water beading on the rice, otherwise the steaming will turn it into mush. |
| Steam the rice for 50 min | I've tried varying the steaming time. I have found that generally it does not effect the weight of the rice as much as soaking the rice does. I preheat the steamer for 10 min beforehand to be more consistent. |
| Cool the rice until it is evenly at 30C or below | Aspergillus Oryzae begins to die at temperatures of 40C-45C. Mix the rice for faster and more even cooling. 30C gives you some buffer space in case your thermometer isn't accurate. |
| Evenly spread 1g of koji starter over the rice | I've read online that you can dose as little as 0.1g of starter per 1kg of rice and still get effective growth. I like to 10x this value to have more consistent growth. Koji starter with flour mixed in might require more dosing. |
| Place the rice into a preferably sanitized 5 gal bucket | A 5 gal bucket is probably far from ideal to grow koji. Koji needs air to grow and spreading it out will prevent it from overheating. However, 1 kg of rice fills the bucket only a couple of inches, and I found it works well enough. See below for notes on sterilizing the bucket. |
| Keep the koji between 30C and 38C, around 80-95% RH, for the next 50 hours. Stir as often as you can. | If you have a humidistat and thermostat, read below on how to set them. I reccomend stirring as often as you can (obviously when you are not asleep!). My first few batches of koji had less water than reqired, and the growth took longer at around 70 hours. I noticed that with the same water content, stirring often made the koji grow faster. The bucket also tends to create heat concentrations, so I reccomend mixing to even out the temperature as well. I usually mixed around every 1hr when I could. Don't let moisture pool up, otherwise your koji will either spore or turn to mush. If you do not have a humidistat, I would place the koji in a more insulated container with a bowl of water and a heat source (like an incandescent light bulb). After this step the koji is complete! |
| Koji is done! | At this point you can remove the koji, let it cool down, and use it in a recipe. |
| If you are making koji starter, continue to keep the koji for another 5-7 more days until spore growth slows. | The spores should turn the surface of the rice green. The spores can be removed by sifting it from the koji. 1kg of rice makes about 30g of spores. |
Notes
A steamer is required for this recipe to work if you want to make regular koji, but a rice cooker will work if you are just making the spores. The problem is that the rice needs to be quite dry at the end of cooking for the Aspergillus Oryzae to grow, but not ultimately spore on the rice. Sporing Koji might lead to bad taste if making sake. Like this website states, you want your rice to absorb 35-40% water after cooking for regular Koji. I believe 50% works well for making koji starter. I think the former water range is allowable only through the use of a steamer.
I have tried to use rice cooker to cook the rice and it either leaves the rice too wet, or if you don't add enough water to try to make dry rice, the rice isn't cooked fully. Cooking the rice with a 1:1 ratio of rice to water by wt. leaves the rice with about 50% water ratio. This is my standard way of cooking rice and it worked for making the koji spores. Adding water to rice in a 2:1 rice-to-water ratio to try to have dryer cooked rice leaves the rice undercooked.
A cotton bag or cheesecloth is required to cook the rice without allowing it to soak/puddle in water. I recommend cheesecloth, because pure cotton tends to puddle and some of the rice ends up too wet.
A thermometer is required to keep track of the koji as it grows, and to make sure that the initial rice has cooled down enough to apply the koji spores. While I haven't experienced this myself, if the rice gets too cold, the koji could probably be slow to develop and grow. If it's too hot (above 40c) you can overstress the mold and cause off-flavors, or just kill the mold.

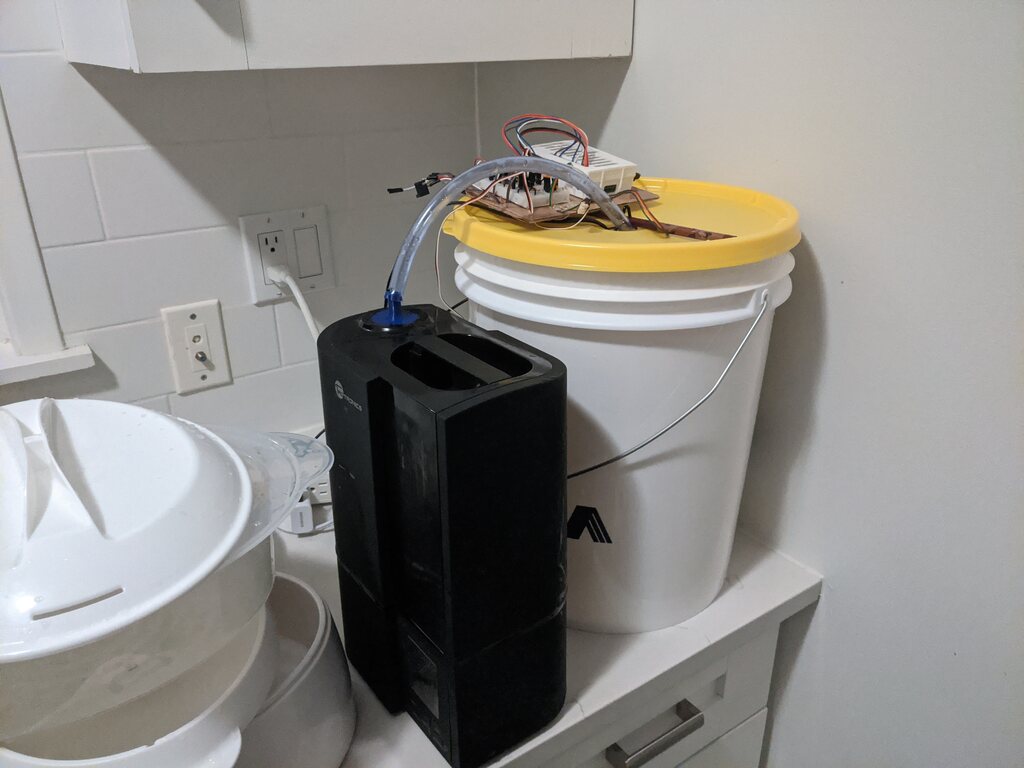
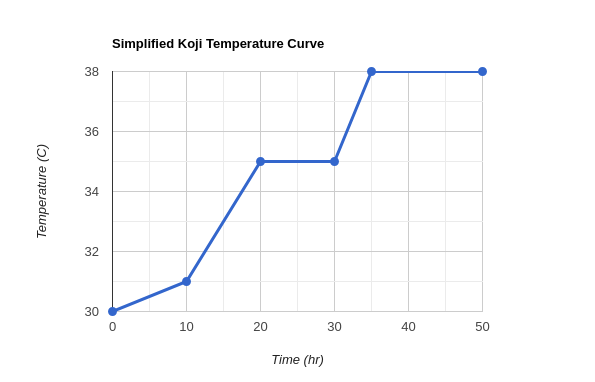
While you could eyeball the temperature for the 2 days during which the koji grows, I prefer to monitor the koji and adjust the temperature to follow a preset temperature profile. I use a Raspberry Pi with Mycodo installed. Connected to the Pi is a I2C thermocouple, and indirectly connected is a WiFi power socket with a 15W heatpad. Mycodo is set to follow a precise temperature profile while the koji grows. I think this is mostly overkill. In the first 24hr the mold is establishing itself so it does need some heat to bring it up to 30C. At 24hr the mold generates enough heat to mostly continue the reaction on it's own. At 48hr the koji needs to be stirred to bring it down below 40C. So YMMV.
Likewise, the computer fan and controllable humidifier are there to keep the humidity under control and provide some airflow to the aerobatic process. I have the fan connected to Mycodo to turn on if the vapor pressure deficit goes below 100hPa. This is to prevent condensation. The humidifier is in a PID loop to keep the humidity at about 85% RH. I hacked control of the humidifier by reverse engineering the main circuit board, finding the MOSFET that controls the humidifier's piezo element, and OR'ing it with a digital output on the PI. You don't need to do this, you just need to add a bowl of water to the mostly-sealed fermentation container and keep the container warm, the humidity will sort itself out.
I believe humidity of the air around the koji is less important to the koji than the temperature. I've varied the humidity between 80% and 95% and have seen no major difference, although enzyme levels are unknown. At least one source advocates for humidity of near 100% initially to allow for quick growth. Others say that 90% RH is desirable, but even as low as 70% is OK.
Temperature
The temperature is quite important for koji growth. It effects the speed of growth and the enzymes which are produced. Too high of a temperature could kill the mold. Above 40C spores are produced earlier, and temperatures above 45C generally kill the mold. For the correct enzymes to make sake koji, I have found the following graph. I have adapted it in my Mycodo control panel to make it simpler.

It's also important to mix the koji to give it access to air and to keep the temperature from running away. Keep in mind that every time you mix the koji, the temperature will fall several degrees.
Sterilization
I have had varying degrees of success with keeping wild yeasts out of my koji by sterilizing the bucket and all tools. The first three times I made this koji, I sterilized the crap out of everything using a chlorine-based compound. I believe this did not help though, as there was a distinct smell of yeast in the first 24 hours of koji production, before the smell turned more into the standard koji smell. The next three times after that, I gave up on sterilization entirely, and the result was exactly the same; a distinct smell of wild yeast initially, followed by the koji smell.
After I made my own koji starter and started using it, the smell of yeast in the initial 12 hours of my batches got even stronger.
I get the hunch that every single time I've made koji I have had a wild yeast infection. Thankfully, this has not had a negative effect on my sakes. It seems like sterilization does not prevent infection in my case. YMMV.
Storing and Using
After the 50 hour period, you can remove the koji and let it cool down. After that, I usually freeze my koji while I made another batch or two. I have noticed that this koji does not keep long in the fridge; a week at most.